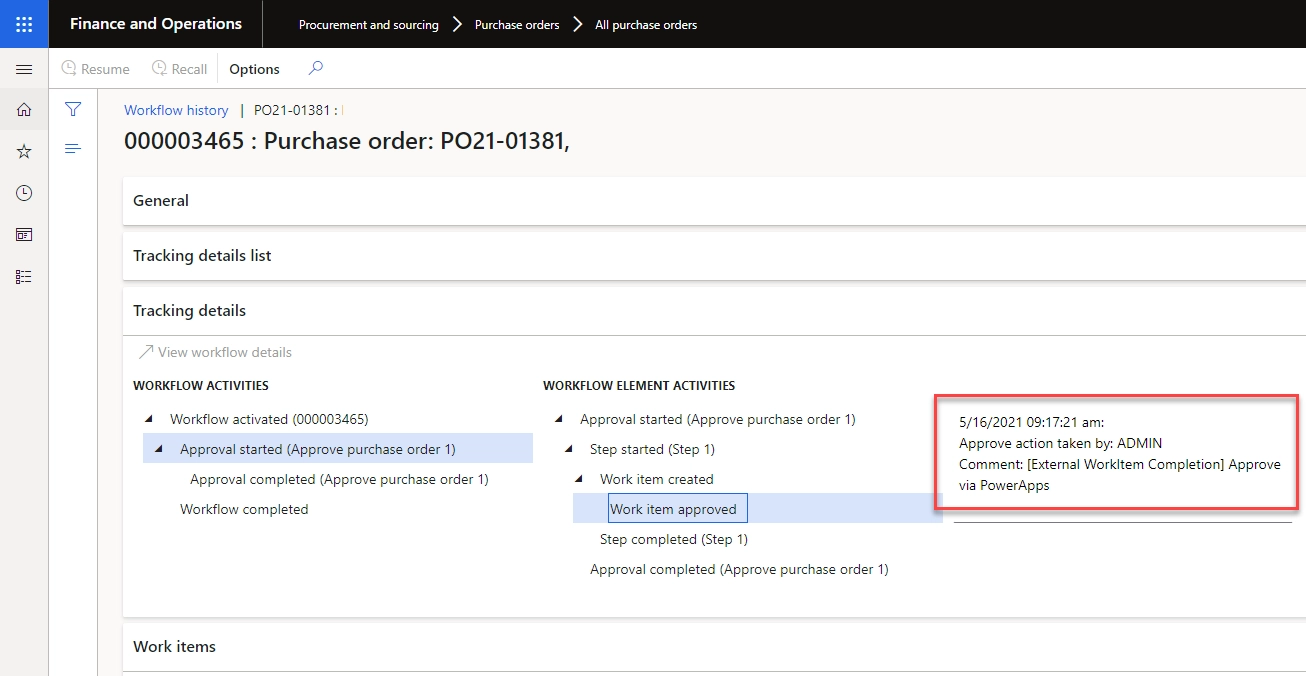
ตัวอย่างในบล็อคนี้ จะเป็นการนำเสนอวิธีการสร้างแอพพลิเคชั่นเซ็นเอกสารออนไลน์ และนำลายเซ็นเข้าสู่ระบบ (Dynamics 365 for Finance and Operations) พร้อมแสดงบนเอกสาร อีกทั้งยังเป็นการ Approve workflow ไปในตัวอีกด้วย โดยใช้ Microsoft Power Apps
Quick Suggest
ถ้าสนใจอยากรู้เพิ่มเติม ขอแนะนำบทความ
- Microsoft Dynamics 365 for Finance and Operations สุดยอดนวัตกรรม ยกระดับธุรกิจของคุณให้ก้าวหน้า
- Power Apps คืออะไร ให้คุณสร้าง App ได้อย่างรวดเร็วแบบ Low-code
- Power Fx คืออะไร : 20 ฟังก์ชันใช้บ่อยและตัวอย่างการใช้งาน (Power Apps)
- Low-code: การลงทุนที่ดีที่สุดสำหรับแผนก IT ในปี 2023
- No code Low code คืออะไร: 10 เครื่องมือที่ดีที่สุดในปี 2023
Power Apps
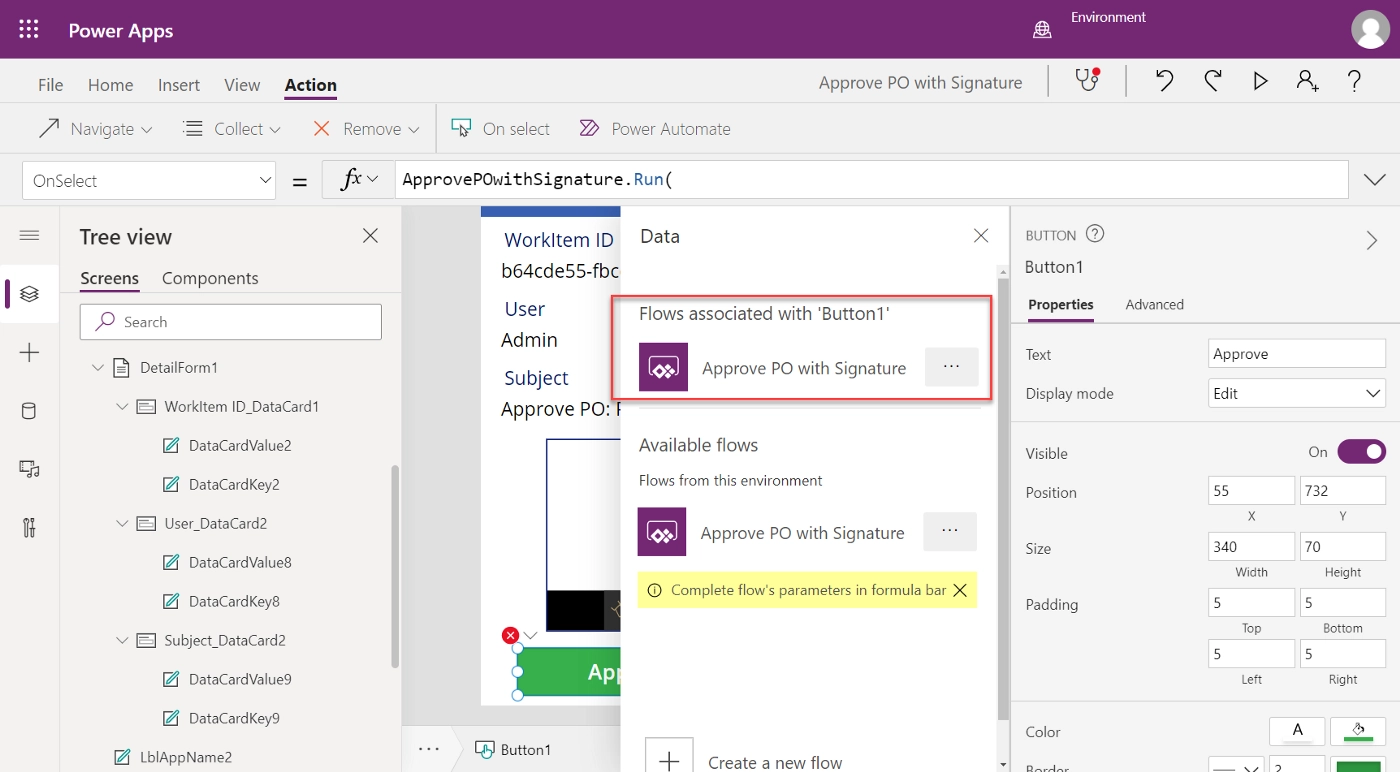
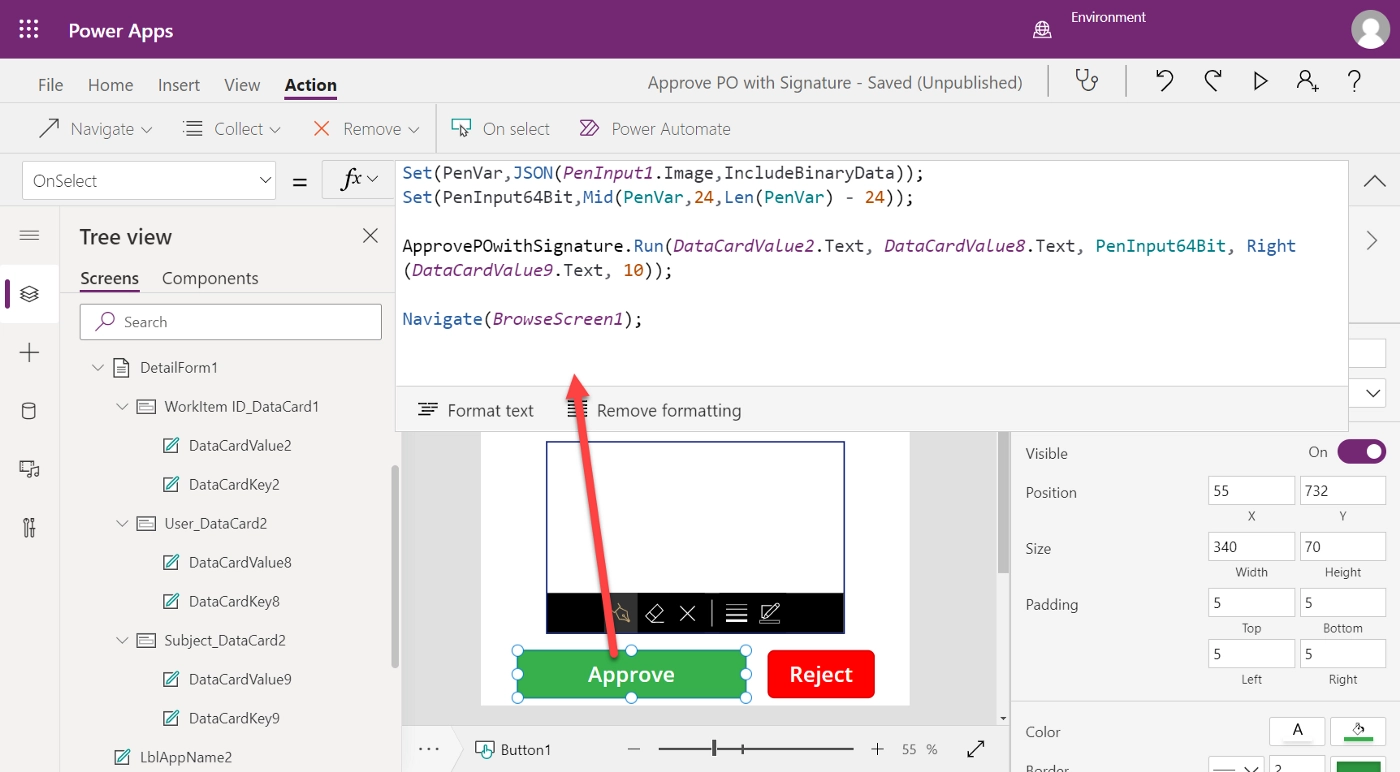
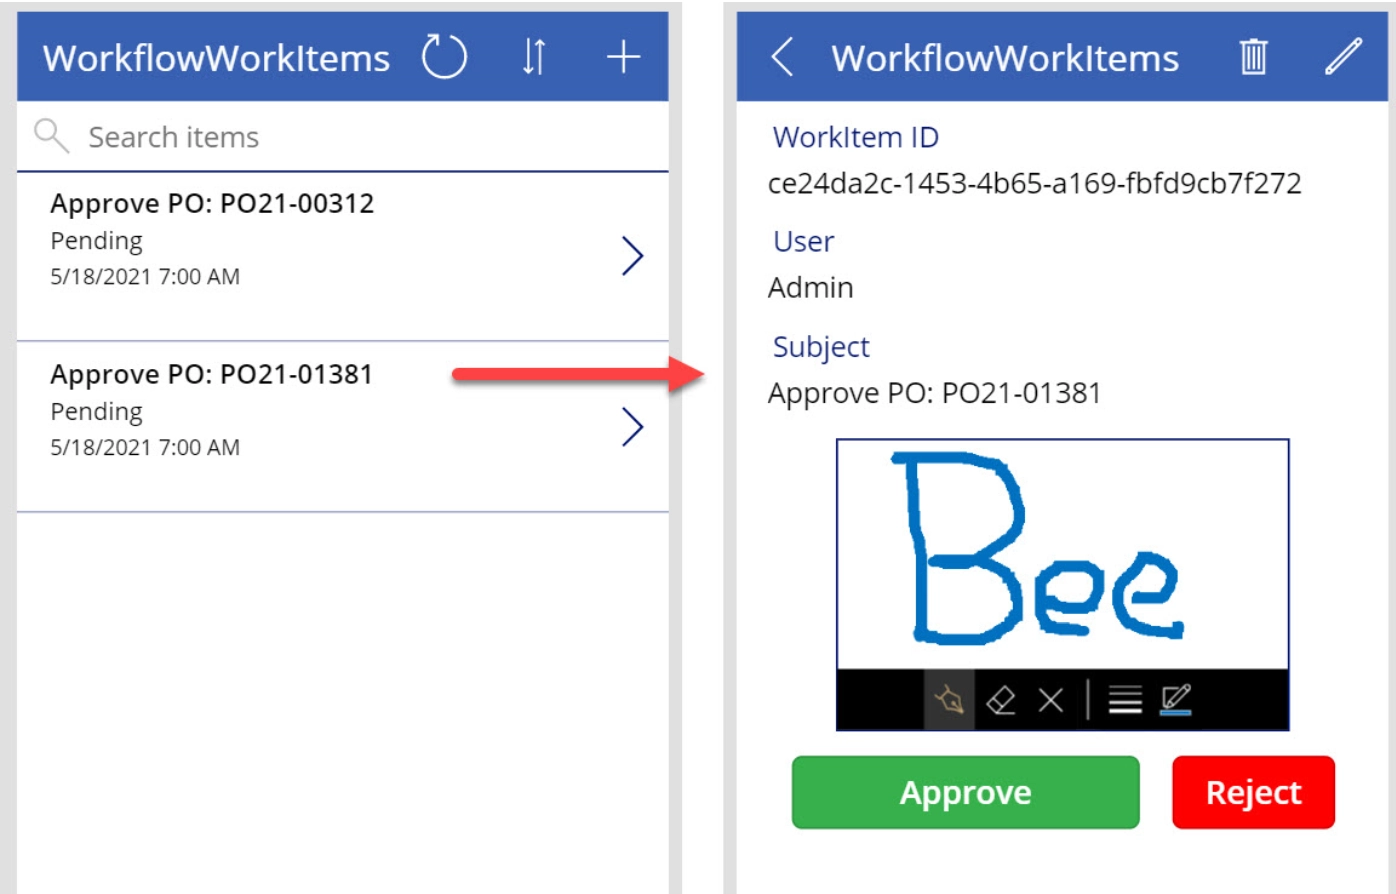
เริ่มต้นจากการสร้างตัวแอพพลิเคชั่น(ซึ่งรันบน mobile ได้) โดยเราจะสร้างแอพเพื่อเรียกดูข้อมูล Purchase order ของระบบที่ต้องทำการ Approve จากนั้นจะทำการ Sign and Approve แล้วส่งข้อมูลเข้าสู่ระบบ
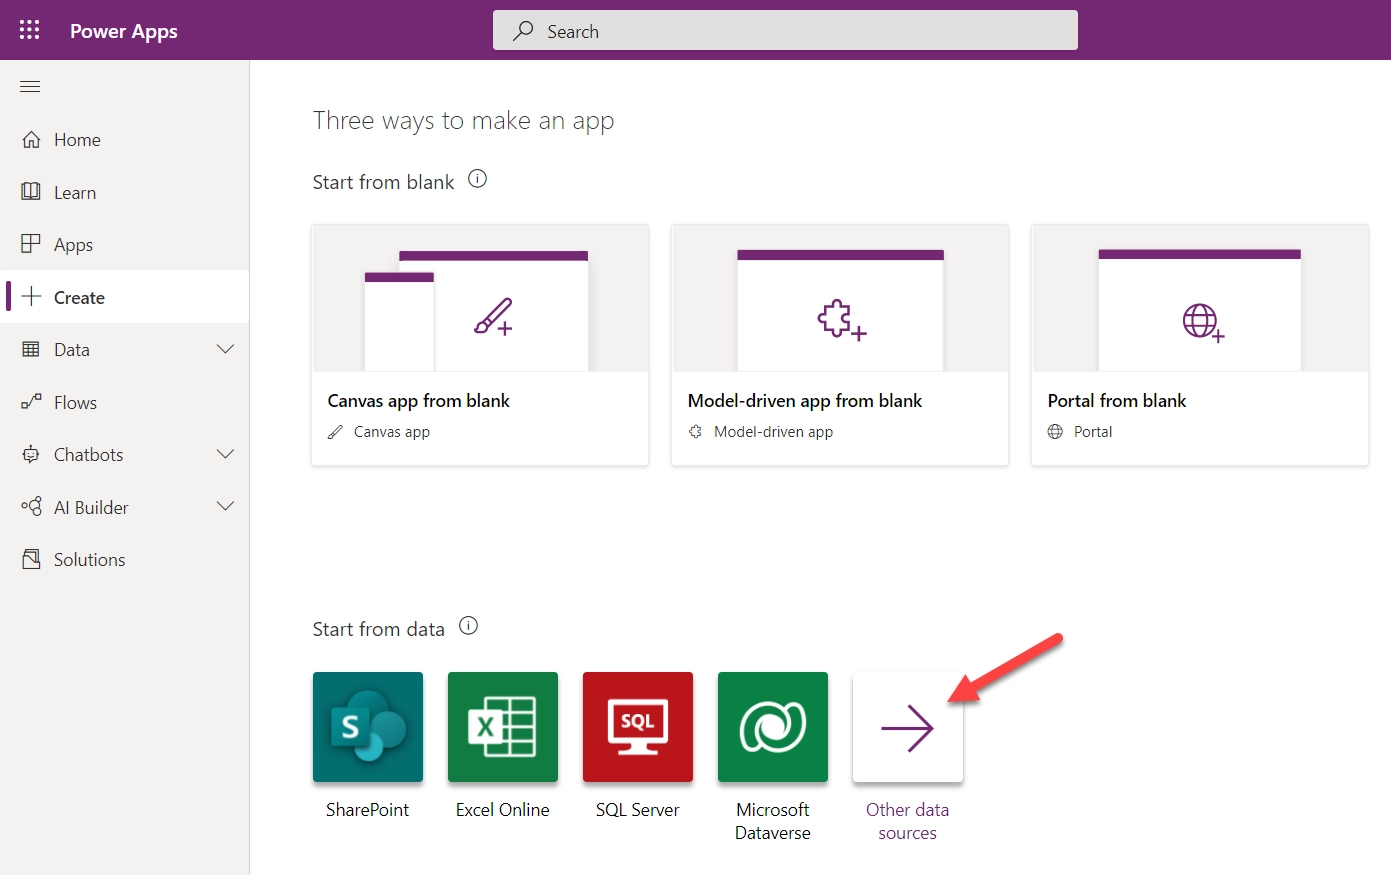
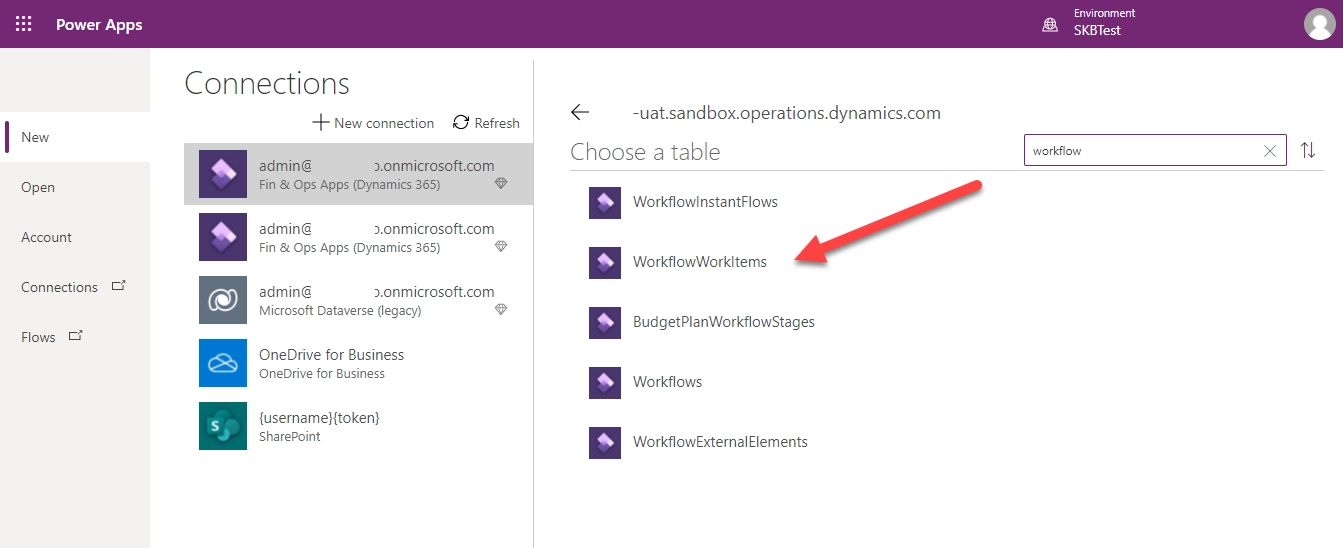
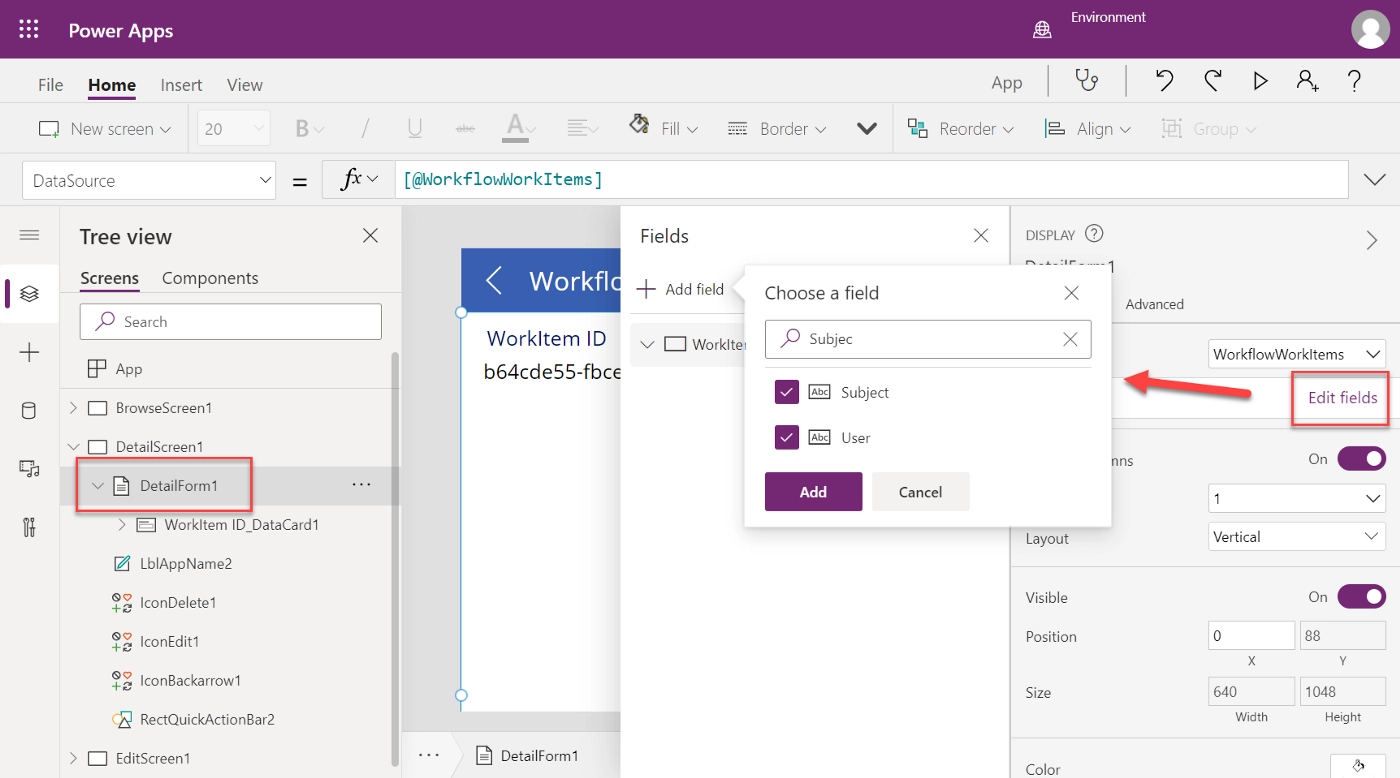
ขั้นตอนคือ เข้าไปที่ https://make.powerapps.com/ และ Sign in จากนั้นไปที่ Create -> Start from data -> New เลือก Connection Dynamics 365,
เลือก Table (หรือ Data Entity ของระบบ) เป็น “WorkflowWorkItems”
![Power Apps Blog 1](https://quickerpthailand.com/wp-content/uploads/2023/07/Power-Apps-Blog-1.webp)
![Power Apps Blog 2](https://quickerpthailand.com/wp-content/uploads/2023/07/Power-Apps-Blog-2.webp)
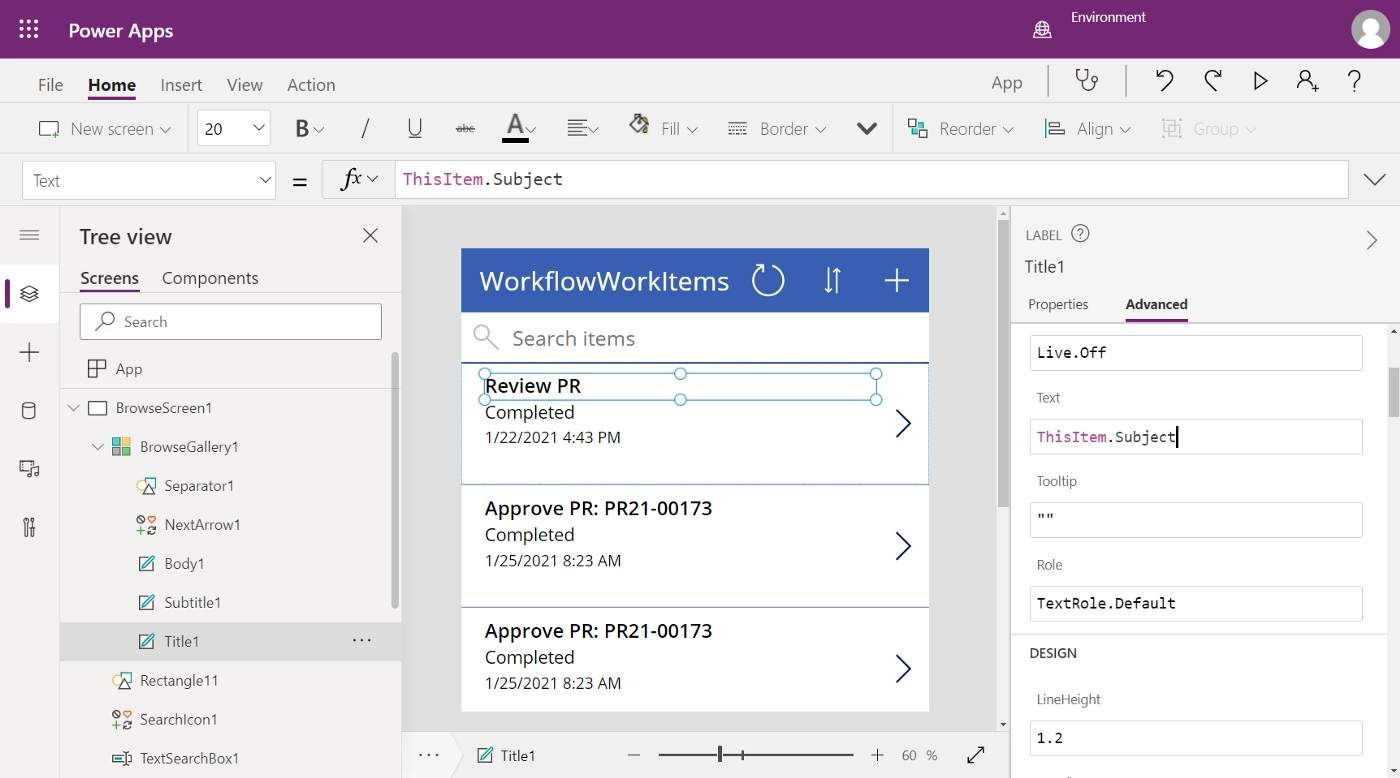
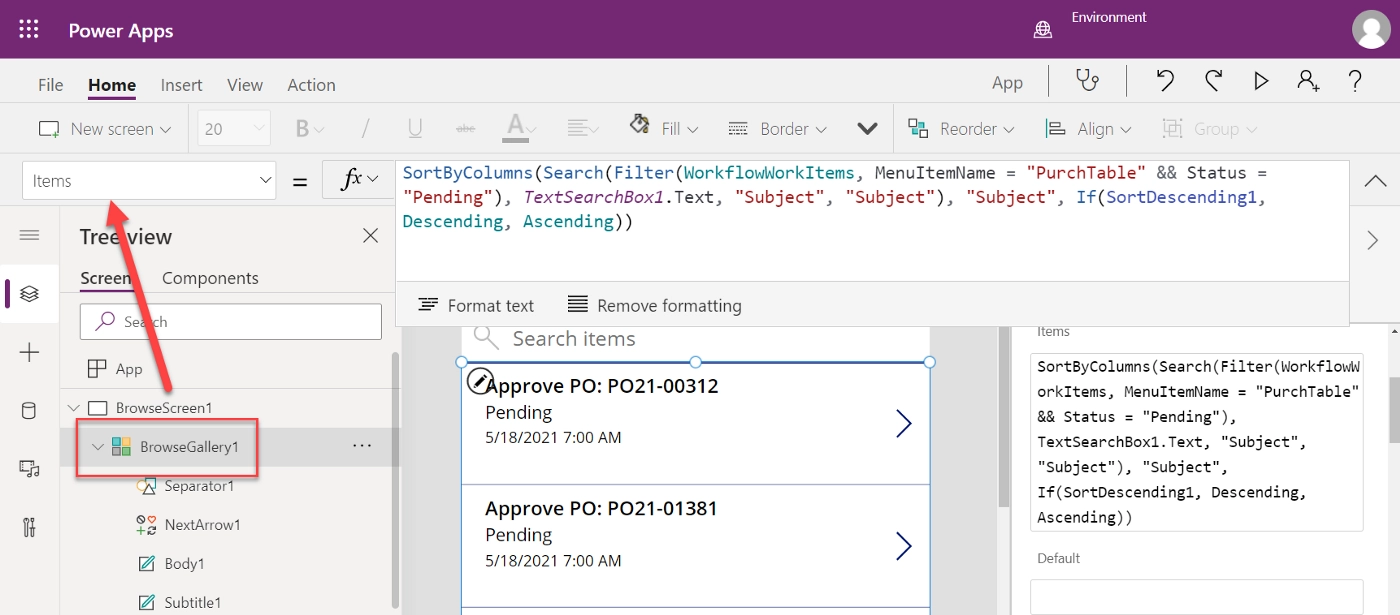
ระบบจะสร้าง template app จากข้อมูลให้ (Browse and Detail Screen)
สามารถปรับการแสดงผลข้อมูลเป็นฟิลที่เราต้องการได้ ที่ Tab Advanced -> Text
![Power Apps Blog 3](https://quickerpthailand.com/wp-content/uploads/2023/07/Power-Apps-Blog-3.webp)
ทำการ filter ข้อมูล กดที่ BrowseGallery -> Items ใช้คำสั่ง
SortByColumns(Search(Filter(WorkflowWorkItems, MenuItemName =
"PurchTable" && Status = "Pending"), TextSearchBox1.Text, "Subject", "Subject"), "Subject",
If(SortDescending1, Descending, Ascending))
MenuItemName = “PurchTable” สำหรับกรองข้อมูลประเภท PO workflow
Status = “Pending” สำหรับกรองข้อมูลสถานะรอการ Approve
TextSearchBox1.Text, “Subject” สำหรับเมื่อพิมพ์ช่อง search items จะค้นหาไปที่ฟิล Subject
![Power Apps Blog 4](https://quickerpthailand.com/wp-content/uploads/2023/07/Power-Apps-Blog-4.webp)
Detail screen จะเป็นหน้าจอที่แสดงขึ้นมาเมื่อเราเลือกรายการจากหน้า Browse
คลิ๊กที่ DetailForm1 -> Properties -> Edit fields
เลือกเพิ่มฟิล Workitem ID, Subject, User เพื่อแสดงผลและสำหรับส่งข้อมูล
![Power Apps Blog 5](https://quickerpthailand.com/wp-content/uploads/2023/07/Power-Apps-Blog-5.webp)
ทำการเพิ่มพื้นที่สำหรับลายเซ็น คลิ๊กที่ Insert -> Text -> Pen input
ทำการเพิ่มปุ่มสำหรับ Approve คลิ๊กที่ Insert -> Button
![Power Apps Blog 6](https://quickerpthailand.com/wp-content/uploads/2023/07/Power-Apps-Blog-6.webp)
ในส่วนของปุ่ม Approve จะใช้ตัว Power Automate มาช่วยในการ integration เข้าสู่ระบบ ERP
คลิ๊กที่ ปุ่ม Approve -> Action -> Power Automate -> Create a new flow เลือก Flow ที่เป็น Power Apps Button
Quick Suggest
ถ้าสนใจอยากรู้เพิ่มเติม ขอแนะนำบทความ
![Power Apps Blog 7](https://quickerpthailand.com/wp-content/uploads/2023/07/Power-Apps-Blog-7.webp)
![Power Apps Blog 8](https://quickerpthailand.com/wp-content/uploads/2023/07/Power-Apps-Blog-8.webp)
สร้าง Flow หลังจากกดปุ่ม Approve
ส่วนที่ 1 เป็นส่วนของการ Approve Purchase Order Workflow
Add action -> Dynamics Fin & Ops -> Execute action
Instance : URL ของ Microsoft Dynamic
Action : WorkflowWorkItems-complete
Outcome : Approve (fix ค่า)
Comment : เป็น text note อะไรก็ได้
ฟิลที่ต้องเลือกแบบ Dynamics content -> Ask in PowerApps
(ความหมายคือต้องการรับค่ามาจากฝั่ง PowerApps โดยการกดปุ่ม)
WorkflowWorkItemInstanceId, TargetUser, RunAsUser
![Power Apps Blog 9](https://quickerpthailand.com/wp-content/uploads/2023/07/Power-Apps-Blog-9.webp)
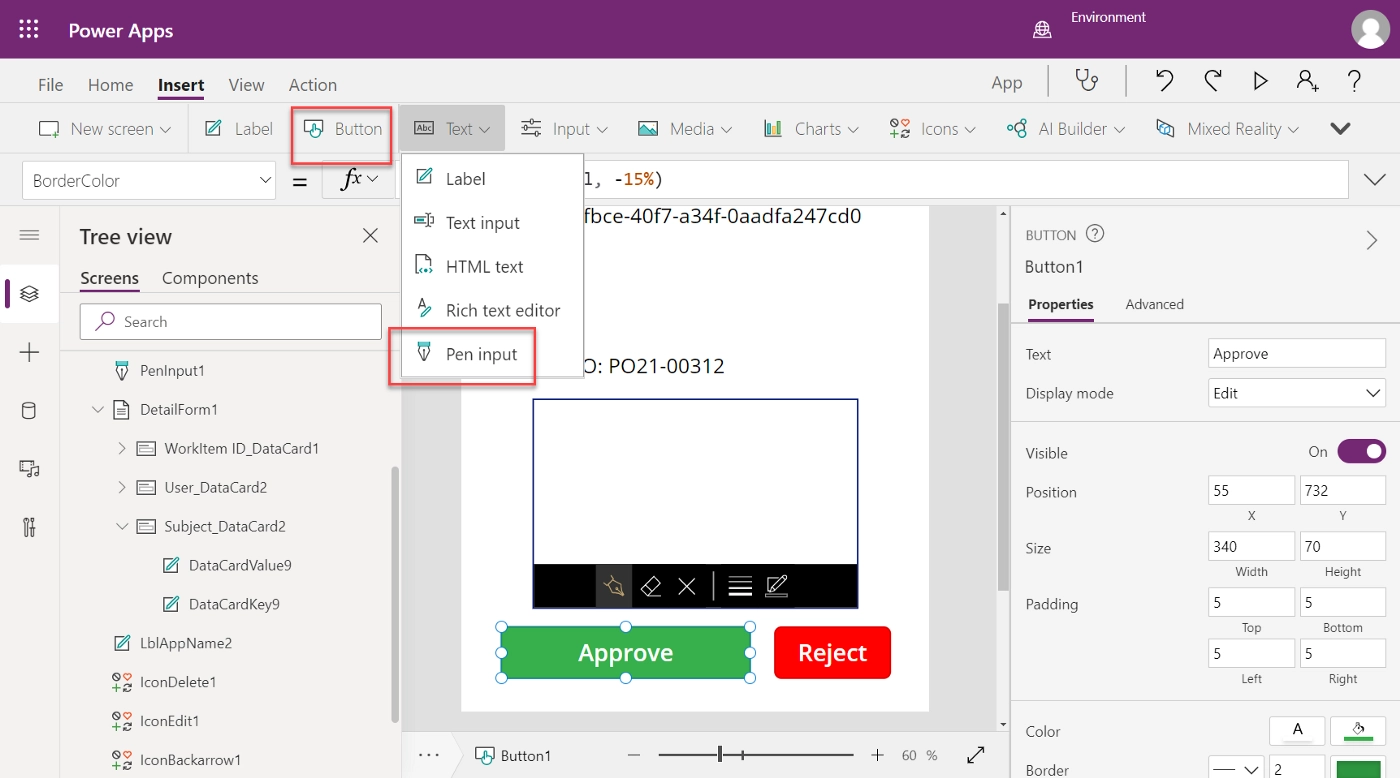
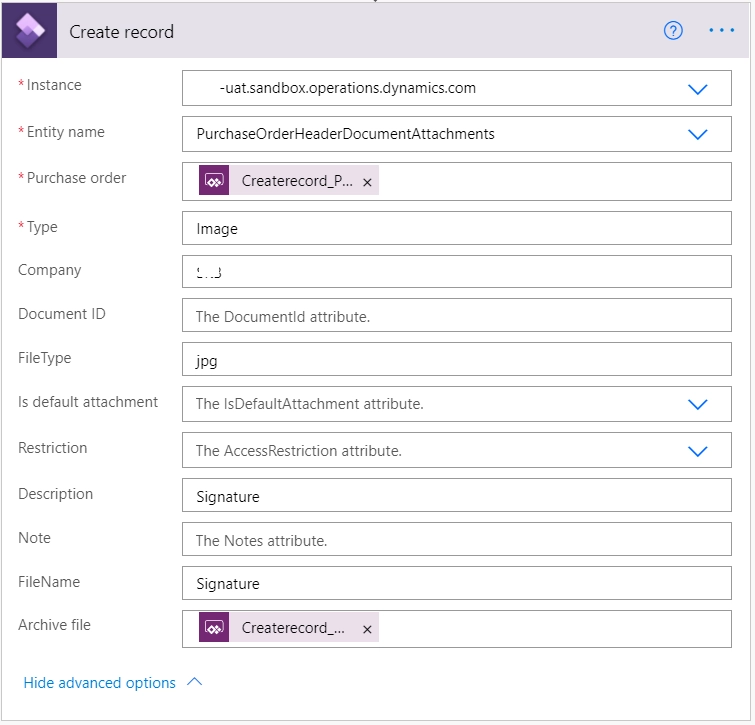
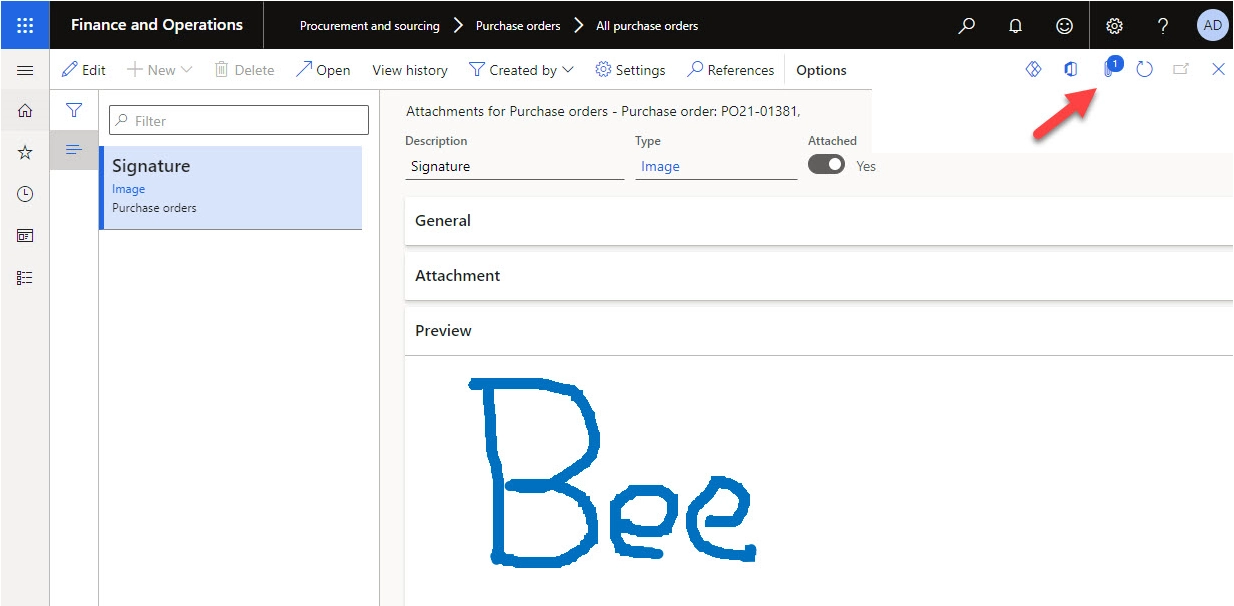
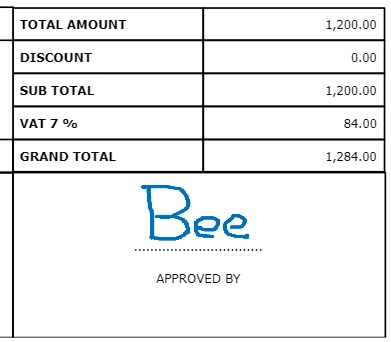
ส่วนที่ 2 เป็นส่วนของการนำรูปลายเซ็น บันทึกเป็น Attach file ของ Purchase Order
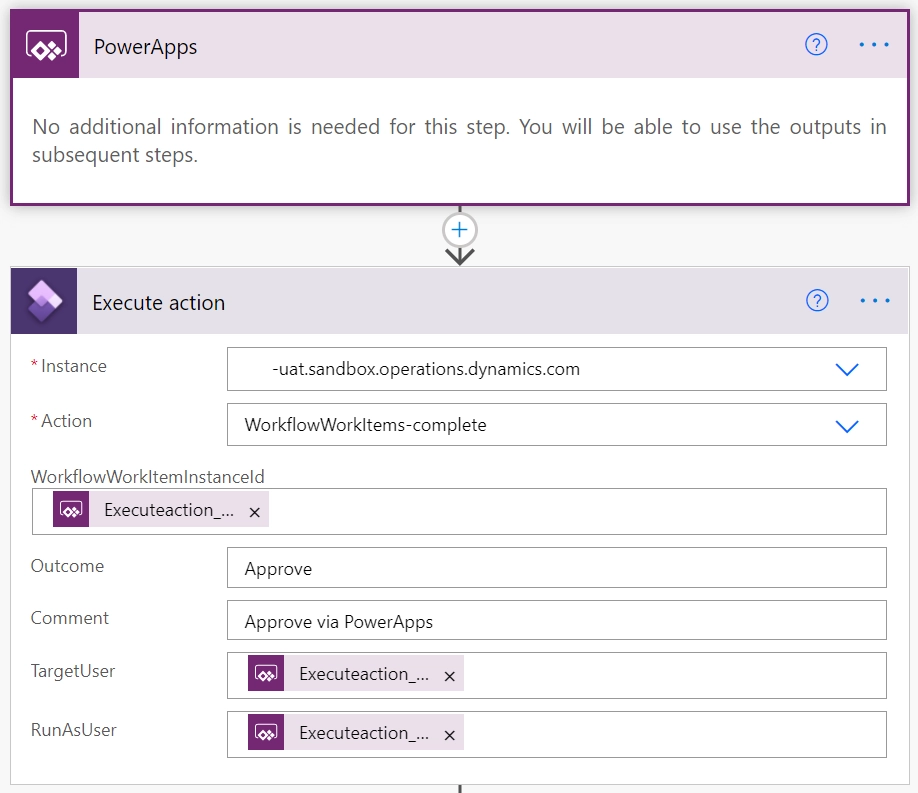
Add action -> Dynamics Fin & Ops -> Create record
Instance : URL ของ Microsoft Dynamic
Entity name : PurchaseOrderHeaderDocumentAttachments
Type : Image
Company : company ในระบบ
File Type : jpg
Description : คำอธิบายของไฟล์ (อะไรก็ได้)
FileName : ชื่อไฟล์ (อะไรก็ได้)
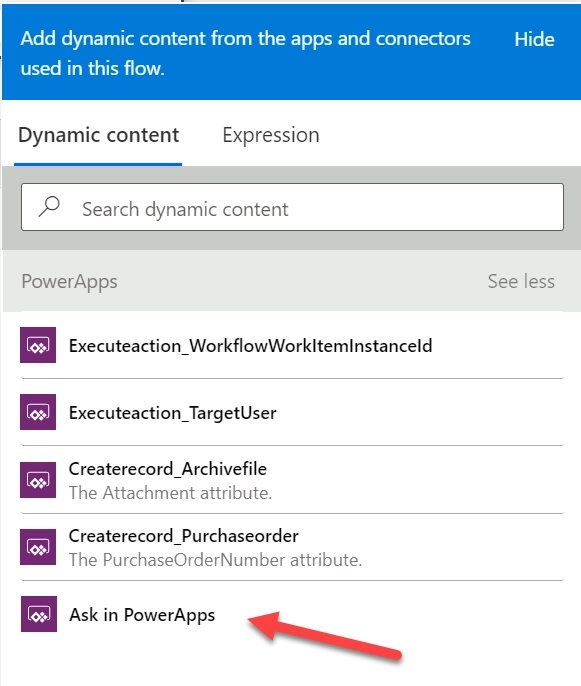
ฟิลที่ต้องเลือกแบบ Dynamics content -> Ask in PowerApps
Purchase order : เลขที่เอกสาร
Archive file : ไฟล์ลายเซ็น ซึ่งถูกจัดเก็บอยู่ในรูปแบบของ binary
![Power Apps Blog 10](https://quickerpthailand.com/wp-content/uploads/2023/07/Power-Apps-Blog-10.webp)
![Power Apps Blog 11](https://quickerpthailand.com/wp-content/uploads/2023/07/Power-Apps-Blog-11.webp)
![Power Apps Blog 12](https://quickerpthailand.com/wp-content/uploads/2023/07/Power-Apps-Blog-12.webp)
เพิ่มคำสั่งที่ Button สำหรับแปลง Pen input เป็น Image
Set(PenVar,JSON(PenInput1.Image,JSONFormat.IncludeBinaryData));
Set(PenInput64Bit,Mid(PenVar,24,Len(PenVar) - 24));
คำสั่งสำหรับส่งค่าตัวแปรไปยัง flow (datacard คือ field ที่เลือกก่อนหน้า)
** ในที่นี้ตัวอย่างข้อมูลไม่สามารถหาเลขที่ PO ได้ ผู้เขียนจึงใช้วิธีการตัด string จาก subject โดยใช้คำสั่ง Right
ApprovePOwithSignature.Run(DataCardValue2.Text,DataCardValue8.Text,
PenInput64Bit, Right(DataCardValue9.Text, 10));
คำสั่งสำหรับกลับไปหน้า BrowseScreen หลังจาก Approve
Navigate(BrowseScreen1);
![Power Apps Blog 13](https://quickerpthailand.com/wp-content/uploads/2023/07/Power-Apps-Blog-13.webp)
เริ่มทดสอบการทำงาน
สามารถ run ได้ทั้งบน mobile หรือ run ทดสอบได้เลยบน Studio นี้ โดยการกดปุ่ม Play (สามเหลี่ยม) ที่มุมขวาด้านบน
เลือก Purchase order, เซ็น และกดปุ่ม Approve
ตรวจสอบไฟล์แนบของ Purchase order ในระบบ จะได้รูปลายเซ็นที่ถูกบันทึกไว้
ตรวจสอบ Workflow history ของ Purhase order
![Power Apps Blog 14](https://quickerpthailand.com/wp-content/uploads/2023/07/Power-Apps-Blog-14.webp)
![Power Apps Blog 15](https://quickerpthailand.com/wp-content/uploads/2023/07/Power-Apps-Blog-15.webp)
![Power Apps Blog 20](https://quickerpthailand.com/wp-content/uploads/2023/07/Power-Apps-Blog-20.webp)
เพิ่มรูปลายเซ็นในเอกสาร
ตัวอย่างการเขียน code ที่ Class “PurchPurchaseOrderDP” สำหรับ assign ค่าไปยัง Report Design
DocuRef DocuRef;
DocuValue DocuValue;
PurchTable PurchTable; // To Do Assign
Select DocuRef
Where DocuRef.RefTableId == PurchTable.TableId
&& DocuRef.RefRecId == PurchTable.RecId
&& DocuRef.ActualCompanyId == Curext()
&& DocuRef.TypeId == "Image"
Join DocuValue
Where DocuValue.RecId == DocuRef.ValueRecId
&& DocuValue.FileName = "Signature"
If(DocuValue.FileId)
PurchPurchaseOrderHeader.ApprovedSignature =
DocumentManagement::GetAttachmentAsContainer(DocuRef);
![Power Apps Blog 21](https://quickerpthailand.com/wp-content/uploads/2023/07/Power-Apps-Blog-21.webp)
ก้าวเข้าสู่ Digital Business
ดูผลิตภัณฑ์ที่เกี่ยวข้องได้ที่นี่